Mission Type: |
Side Mission |
Section: |
Ubersreik Act 3 |
Chests: |
9 |
Tomes: |
0 |
Grimoires: |
1 |

| |
|
Synopsis[ | ]
The White Rat is the final mission of the 3rd act of the base game. The heroes descend below ground where they encounter the grey seer leading the invasion. He has a protective barrier around him and cannot be killed with ranged weapons nor bombs. The heroes have to clear a large room filled with alchemist's equipment and cut a chain holding a door closed. They then must bring three barrels of gunpowder to the tower the White Rat is standing on to weaken its foundation. Finally, the party ascends to the uppermost level of the map and breaks the chains holding the tower in place. Once done, the tower and White Rat fall into oblivion ending the mission. ЬОВЦ
Tomes and Grimoires[ | ]
This mission contains only one Grimoire and no tomes.
Grimoires[ | ]
The first and only Grimoire of this mission is located at the very beginning. Instead of going down the stairs in the ruins, go around the broken down wall and make 2 jumps to cross into the destroyed homes; the grimoire is at the second floor.
Video of White Rat Grimoire location
Guide[ | ]
White Rat is generally considered to be the most challenging mission in the core Vermintide game. Multiple scripted events and plenty of opportunities for players to become separated can lead to team wipes at virtually every stage of the mission. With that said, a team that is able to remain cohesive will find themselves able to beat White Rat consistently even on the most challenging difficulties.
Event 1: Open the Door Leading to the White Rat's Tower[ | ]
The mission begins with the Grey Seer taunting the players from within a magical shield as the players overlook a large open area and several layers of platforms and stairs in the distance. A blast of magical energy will shatter a railing allowing the players to drop down and fight their way to a chain which must be cut in order to lower a door that grant access to the upper levels of the map. While the players are still at the overlook, there are always at least two stormvermin located near the chain that can be sniped, and occasionally more are visible standing around as well. If not killed outright, these stormvermin (along with other triggered rats) will make their way up and across the aerial walkways to fall down onto the overlook location. Here they can be easily killed or pushed off a stone bridge to their death.
The fight to the chain is the first difficulty spike on the map, as the players will face a constant stream of rat spawns and specials. Whichever route to the chain is chosen (e.g. hug the right-side wall), the players should take care to remain at least loosely grouped for mutual protection. Steady forward progress is important, as the spawns won't stop, but so is "not dying". Having the team fracture here and get wiped out is quite common. Once the chain has been cut, an extra stormvermin-heavy wave will be triggered. These can either be defeated by cornering up (this works well on lower difficulties) or by having the whole team drop back down towards the map's start in order to linearize the battle, funnel the rats, and make them more vulnerable to grenades. Speaking of grenades: use them or lose them. There will be more ahead, and a whole team dying with four grenades in their inventory is a sad, sad sight. мхют
Event 2: Boom-barrel the Grey Seer's Tower[ | ]
After passing through the lowered door from the first event, the players will find some resources (leave extra health here, you might want to come back later) and a staircase leading upwards. Walking to the top of the stairs will trigger the second event and a steady stream of hordes & specials. Don't go up the stairs until the entire team is ready to proceed! There are three barrels located in this area which must be placed on the Grey Seer's tower in order to complete the event (and stop the steady stream of hordes and specials). This section is very apt to split up your group and lead to a team wipe if players fail to agree up on a plan or tell each other what they are doing. The fact that the barrels will be ignited (and lost) if they are hit by the players' weapons or a player is hit while holding a barrel can lead to this section requiring 10 minutes to complete instead of about 1:30 in the best case scenario. Be careful with the barrels and ask your teammates to be careful with the barrels. Mercifully, players that die during this section of the map will respawn near the event's start, which allows the team to regroup as long as someone can stay alive long enough to perform the revives. A shared speed potion used towards the end of this event (to wrap it up) can be very useful, whereas a speed potion used early is often wasted because the amount of initial rats and specials can vary widely and lead to different optimal beginning strategies.
Event 3: O Hai Roger and Topple the Seer[ | ]
The final event of the map triggers once the players first arrive at the very uppermost level of the mission, where they will see four chains that must be destroyed. The event also triggers an ogre spawn, with the Rat Ogre arriving approximately 10 seconds after the event has begun. Killing the ogre at this location can be quite difficult as rat spawns will be arriving from all directions at the same time. For this reason, many players either retreat back to the area where the barrels were spawned or even drop all the way down to the floor of the cavern in order to make the ogre battle more orderly. Once the event has begun, the players will face a steady stream of hordes and specials until the end of the level. Success during this final phase mostly requires staying together and proceeding through the four chains as quickly as possible (but no faster). Resist the temptation to "rush" the chains as isolated players can quickly succumb to the ambient spawns and specials. Kiting is difficult as rats will be appearing from all directions and routes are limited.
As soon as the last chain has been broken, victory is yours. Well done! You've defeated the Grey Seer and stemmed the Vermintide. For now.
Tips[ | ]
- If you left any health in the are after the first event (Chain & door), you can retrieve it either after the barrels event (there will be minimal spawns) or after the ogre battle.
- There is a brief window before the Grey Seer teleports from his initial location when a stormvermin near the chain can be easily sniped by a long-range player. After the Grey Seer has teleported, this stormvermin can still be pulled but not headshotted (without a trueflight bow or bolt staff).
- The ammo crate after the first event is always there, as are three ammo packs just before the third event. It can be useful to replenish ammunition here after killing the ogre and before proceeding to break the chains.
- There is a guaranteed medkit located in a difficult-to-spot location directly overhead on a platform as the players head upwards from the barrels section. Use your "ping" key to locate it and then jump to grab it.
Gameplay video[ | ]
White Rat Full Book Run, Death Wish
Map[ | ]
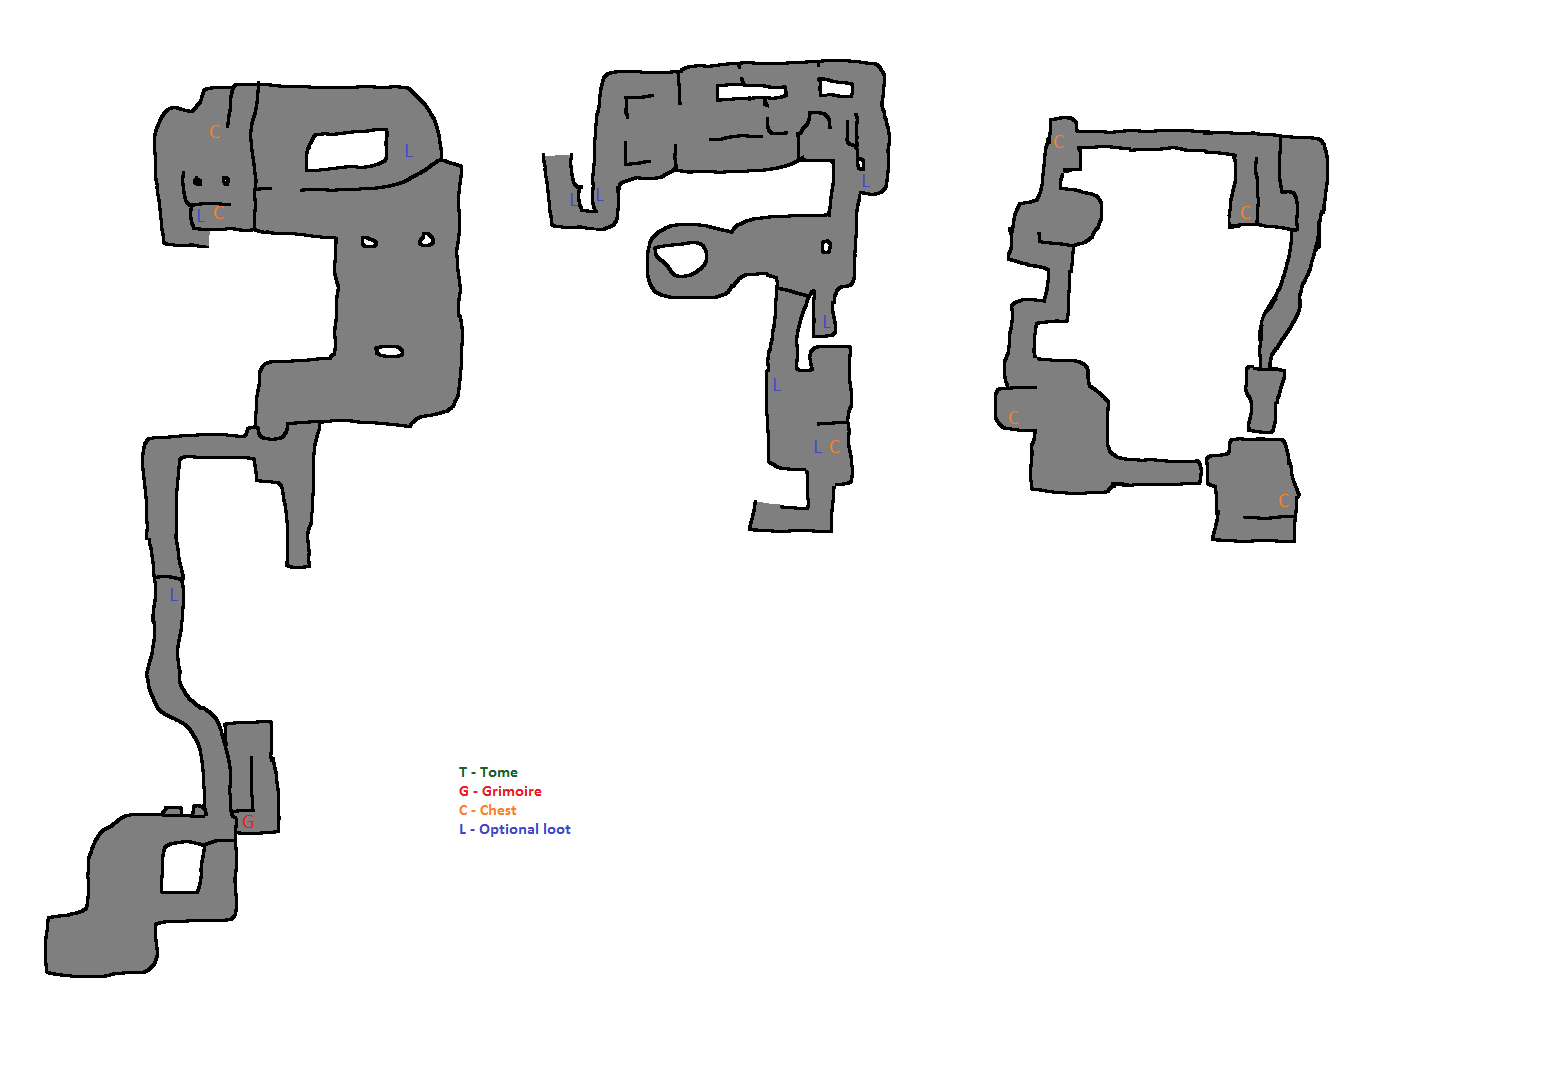
| Ubersreik | Act 1 | The Horn of Magnus • Smugglers Run • Supply and Demand • Black Powder • The Wizards Tower |
|---|---|---|
| Act 2 | Engines of War • Man the Ramparts • Garden of Morr • Wheat and Chaff | |
| Act 3 | Waterfront • Well Watch • The Enemy Below • The White Rat | |
| Last Stand | The Fall • Town Meeting | |
| DLC Missions | Drachenfels | Castle Drachenfels • The Dungeons • Summoner's Peak |
| Karak Azgaraz | Khazid Kro • The Cursed Rune • Chain of Fire | |
| Stromdorf | The Courier • Reaching Out | |
| Death on the Reik | Reikwald Forrest • River Reik | |
| Arrogance Lost | Trial of the Foolhardy | |