Mission Type: |
Main Mission |
Section: |
Karak Azgaraz |
Chests: |
6 |
Tomes: |
3 |
Grimoires: |
2 |

| |
Synopsis
Khazid Kro is a mission in the Karak Azgaraz DLC.
Seeking to recover a Cursed Rune, your party must first recover a keystone from the Dwarfen stronghold of Khazid Kro, where it is being held by a brewer/engineer named Halgrim. Halfway through the mission, Halgrim will offer to exchange the keystone in return for the heroes' help in sealing of three Skaven tunnels. Once this is done, Halgrim hands over the keystone (off camera, so to speak) and a wall falls away to reveal Oleshya's cart. Your party will use the keystone during the subsequent DLC mission "Cursed Rune".
Tomes and Grimoires

Tomes
The first and second Tome are located in large, open areas on either side of the Statue of Valaya, named "Grollo's Alley" and "Winterfoam Lane".
The third Tome can be found by sticking to the right side of the area also featuring a great chasm and wooden scaffolding.
Grimoires
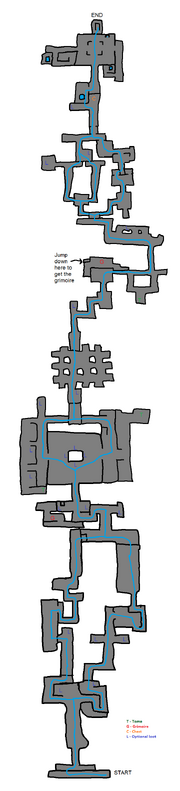
The first Grimoire is hidden behind an easy jumping puzzle early in the map, just prior to the Statue of Valaya.
The second Grimoire is located in an area featuring a great chasm and wooden scaffolding. Staying to the left side upon entering that area will lead the player to the drop-down-entrance to the short jumping puzzle. The book can then be retrieved from a wooden trough (bucket).
Video guide to Khazid Kro tomes and grimoires
Guide
Khazid Kro isn't an exceptionally difficult map, but both events can veer into chaos if your team fails to coordinate. There is normally one ogre spawn and one patrol, though more are possible.
Event 1: Steam Room
During this event, the heroes must make their way to a series of valves (the sequence being randomized) that line the walls of a large, rectangular room while fighting off hordes and specials. Visibility in the stream room will grows progressively worse after each valve. The simplest strategy is simply to proceed to each target valve *en masse*, and to then return to the barred gate where you initiate the event while you await directions to the next valve. Alternatively, the entrance to the steam room provides a natural funnel for the rat hordes as well as more room to retreat and a narrower line-of-sight to potential gunners and gasrats, with the disadvantage of allowing occasional spawns from the platform behind the heroes. Some groups prefer to hold out at the valve locations themselves, especially those *without* pipes running overhead which can be a source of rats dropping on your heads. Note that once you have begun activating a valve, you are free to turn completely around which is useful to watch out for stray rats attacking while you're vulnerable.
Once the valves have all been turned as per Halgrin's instructions, a door will open into a steamy corridor. Mere seconds later, a horde of slave rats will spawn from two locations on either side of this corridor. This wave of rats is easier to deal with by remaining in the door area rather than passing through into the corridor immediately.
Event 2: Skaven Tunnel Demolition
Upon reaching the finale area, you will initiate the final event by activating the dwarfen speaking tube. After defending against one horde, an explosive steam barrel with tumble down a chute near the speaking tube. Once this barrel is removed from it's spawn location, it will begin a countdown timer until it either is thrown into one of the three Skaven tunnels (collapsing the tunnel) or it explodes. In either case, a new barrel will spawn shortly thereafter. Once all three tunnels have been demolished, the finale is over and you will escape in the cart.
The key ingredient to success during this event is for the team to agree in advance on the sequence of tunnels to be destroyed. From the perspective of standing by the barrel spawn looking towards the main room, the three tunnels are typically designated as "Left", "Middle" and "Right". As long as the team sticks together, all potential sequences are viable. With that said, "Left, Middle, Right" may have an edge because "Left" has the easiest and most secure return to the barrel spawn (as you can jump straight down from the tunnel to the main room) and by finishing on "Right" the heroes will avoid a sometimes-difficult fight back to the main area via a long staircase as no hordes will spawn once all three tunnels are sealed.
Shared speed potions can allow the completion of this event quickly and safely, if they can be saved for the finale. Lastly, it is possible for a hero to toss the explosive barrel directly from the floor of the main area into the elevated Skaven tunnel at "Left". This is a tricky move that should be practiced on lower difficulties before being attempted during a dicey maximum-effort run.
Tips
- Remember to open every chest. There are 6 chests in total. This gives you a good chance of receiving at least one Cursed Die, especially if you use a Luck Stone.
- The Stormvermin patrol on this map can (virtually?) always be avoided if detected by ear, although sometimes it will spawn at such close range that it will attack immediately.
- There are several guaranteed ammo box locations on this map. This allows you to fire your ranged weapons quite freely as long as you know when your next resupply is coming.
Gameplay video
Khazid Kro Full Book Run, Nightmare.
Khazid Kro Tomes and Grimoires Location Guide
Map

| Ubersreik | Act 1 | The Horn of Magnus • Smugglers Run • Supply and Demand • Black Powder • The Wizards Tower |
|---|---|---|
| Act 2 | Engines of War • Man the Ramparts • Garden of Morr • Wheat and Chaff | |
| Act 3 | Waterfront • Well Watch • The Enemy Below • The White Rat | |
| Last Stand | The Fall • Town Meeting | |
| DLC Missions | Drachenfels | Castle Drachenfels • The Dungeons • Summoner's Peak |
| Karak Azgaraz | Khazid Kro • The Cursed Rune • Chain of Fire | |
| Stromdorf | The Courier • Reaching Out | |
| Death on the Reik | Reikwald Forrest • River Reik | |
| Arrogance Lost | Trial of the Foolhardy | |